Monday, July 20, 2009

Birds Nest Soup- Good for your skin


A lot of people think that birds nest soup is very difficult to prepare. As such, most of us ladies rely on our mothers to brew this special tonic for us. I am going to show you step by step here how to prepare this tonic that is nourishing and also good for the skin. If you want porcelain skinned complexion, this soup is a must. All the people I know who have the best translucent skin will tell your their secret is this soup.

Ingredients (Serves 2)
1 piece of Birds Nest
3-4 pieces of Rock Sugar
2 cups Water
American Ginseng (2 slices-Optional)

Directions:
1) Soak the birds nest for at least 2 hours or up to overnight until soften. Depending on the grade of birds nest, you may have to use a pair to tweezers to pull out the tiny feathers sometimes embedded in the nest. Very good quality birds nest will have less of this feathers. Change the soaking water twice during the entire soaking process.

2) Drain the water.
3) Put birds nest in a double boiler pot, add 2 cups of water. Add rock sugar and ginseng (optional). Cover the double boiler and put this in a stock pot.

4) Fill the stock pot with water until the level covers the double broiler half way.

5) Cover the stock pot and bring the water to a boil, and lower heat to a simmer. Simmer for 1.5 hours up to 2 hours.

6) Remove the birds nest soup from the double boiler pot and serve hot.

Wasn't that simple? I hope you enjoy this recipe. Try it! It is good for your skin and health and will keep you looking young.

Have a good week ahead.
Sincerely,

Julie

Sunday, July 5, 2009

Singapore Fried Carrot Cake

Fried carrot cake is a traditional Singaporean breakfast food, although it is now eaten as a snack at all hours of the day. I remember going through teenage angst, and in the morning, nothing would get me out of bed faster than mom coming home from the market, knowing that she bought a packet of Chai Tao Kway- Fried Carrot Cake, wrapped in laminated brown paper like a pretty present, with the oil starting to soak through the semi water proof packaging. Once I remove the rubber band holding this package together, the smell of garlic, salted radish
(chye poh) and chili would wake me up and make me so happy. To this date, I will always remember the types of chai tao kway my mommy had lovingly brought back from the market over the years: The black kind- no chili sauce (For when I was a child), The "white" kind (teenage years- my taste platelet started to change), any of the two above in a"less oily" version (when I was a young adult and started to watch my figure), this dish is always the comfort food that I grew up with.

I had a little time this last weekend and decided that I needed my fix. Here is the recipe I used to make my breakfast snack and I hope you will like it. I certainly enjoyed eating my creation.

Carrot Cake (From scratch) - This portion size serves 4
125 g radish (Shred using a vegetable shredder)
300 g rice flour
750 ml + 3/4 cup of room temperature water
1 tbsp vegetable oil
1.5 tsp salt
1 tsp sugar
1/2 tsp white pepper

1) Measure the water in a large bowl.
2) Add the rice flour to the water. Mix with a whisk to remove all lumps.
3) Heat the vegetable oil in a wok or a deep pan. Stir fry the radish until the edges are starting to turn brown.
4) Slowly add the flour-water mixture. Add the salt, sugar and pepper.
5) Continue to stir the flour rice mixture until it starts to thicken. (See picture).

6) Scoop out the mixture and pat into a greased 8 inch baking pan. Smooth the top with a metal spoon and pat the mixture down firmly.
7) Place in a steamer and steam on high for 45 mins or until the radish cake has set.

(Let this cake sit overnight before stir frying).


Frying the Carrot Cake (White, Spicy Version)

Preserved, salted radish (Available at Asian specialty food stores)- 2 tablespoon. (If buying radishes in whole, please chop until minced garlic size before using).
Sesame oil- 1 tsp
Salt and white pepper to taste
Soy sauce - 1 tbsp (or to your taste)
Fish sauce- 1/2 tsp (or to your taste)
Chili sauce -1/2 tbsp (or to your taste) - I used store bought chilli sauce from Asian specialty stores.
Garlic- 2 cloves- minced
3 eggs
Green onions (Separate white and green portions) - 2 sprigs
Oil for frying or lard- 4 tbsp

1) Cut up the radish cake into 1/4 inch cubes.
2) Mise en place - garlic, green onions (green and white portions) and eggs (beaten).
3) Heat oil in a wok or frying pan.
4) Add in garlic, preserved radish and white portion of the green onion. Stir fry until the garlic looks like it is about to brown.
5) Toss in the radish cake and with the spatula, break it down in a slight mashing/slicing motion. (This step is important because it exposes more surface area on the radish cake, allow more flavors to be absorbed).
6) Add the seasonings (soy sauce, salt, pepper, chili sauce, fish oil and sesame oil).
7) Fry until the radish cake looks browned on the edges and heated through.
8) Make a well in the center of the wok and add eggs.
9) Toss the egg mixture over the radish cake as if to coat the surface.
10) Serve hot garnished with the green portion of the green onion.

I hope you wake up happy everyday with this dish.

Have a good week ahead!

Sincerely,
Julie

Saturday, June 20, 2009

Paula Deen's Gooey Butter Cake

Paula Deen's Gooey Butter Cake


Recently my travels bought me to Savannah, GA. I took the opportunity to visit Paula's Deen's Lady and Sons restaurant.


I was so excited to eat at Paula Deen's because I love butter and wouldn't normally cook with it..AND at the same time, I love how Southern cooking and its flavors reminded me of my youth as a student in Virginia. I was so carefree and innocent.

Anyhow, after I secured a seat at the restaurant, I ordered ice tea and chowed down on fried chicken, collard greens, black eye peas, Lima beans, sweet potatoes, ribs.... everything all soaked in peanut oil or butter of course. Yummy! When it was time for dessert, the waitress asked me if I wanted peach cobbler or "gooey butter cake". Ooooohhhh... of course I didn't have much room left in my tummy.. but gooey butter cake sounded irresistible, so I ordered it. When the cake came and I tasted it, I knew it was a winner. I also knew Eric would love this cake.

So, for his birthday yesterday, I baked his cake for him. The result? He loved it!

Here is the link to the recipe:

http://www.pauladeen.com/recipe_view/795

I have also typed it out here. Try it, you will be comforted.

Ingredients & Directions:

Cake: 1 18 1/4-ounce package yellow cake mix 1 egg 8 tablespoons butter, melted.
Preheat oven to 350 degrees F.

Combine the cake mix, egg, and butter and mix well with an electric mixer. Pat the mixture into the bottom of a lightly greased 13 by 9-inch baking pan. Prepare filling.


Filling: 1 8-ounce package cream cheese, softened 2 eggs 1 teaspoon vanilla 8 tablespoons butter, melted 1 16-ounce box powdered sugar.

In a large bowl, beat the cream cheese until smooth. Add the eggs, vanilla, and butter and beat together.Next, add the powdered sugar and mix well.


Spread over cake batter and bake for 40 to 50 minutes.

Make sure not to over bake as the center should be a little gooey.

Yield: 6 to 8 servings
Preparation time: 30 minutes
Cooking time: 40 minutes
Ease of preparation: easy

Recipe courtesy Paula Deen and Random House Publishing

Happy Birthday!!

Have a good week ahead.

Julie

Monday, May 25, 2009

New Puppy and Ang Ku Kueh


Ang Ku Kueh is a delicious Chinese/Nonya snack. It is often eaten during special celebratory events such as baby's first month, weddings and birthdays. The red color of the kueh is believed to be good luck.

There are two types of Ang Ku Kueh fillings: Green bean (Mung beans) and peanut. I prefer the mung bean version so it is the version I made. The mushy, velvet texture of the mung bean, wrapped in a chewy, elastic glutinous dough... one bite and you'll be hooked too.

So... what was the special occasion? Haha....well, I got a puppy. He is a beautiful West Highland Terrier. I love him to bits. So here's the Kueh to help celebrate and welcome him to our family.

Ingredients:
Glutinous rice 300 g
Sweet Potato 50 g skinned
Banana leaf (Shaped oval -12 pieces)
Water 220 ml
Ang Ku Kueh Mould
Coloring (Red-Optional)


Fillings
Green Bean 150 g (Steamed)
Sugar 100 g
Cooking oil 2 tbsp
*Soak green beans overnight and steam for 20 mins on high heat or until soft. Remove from heat and mash up. Blend in food processor with sugar and cooking oil until smooth. (I used organic green/mung beans, the specks of black are from the bean shell). If you do not have a food processor, you can mash the bean up and then pass it through the wire sifter a few times.


Directions:
1) Boil sweet potato in a pot, drain water and set aside. Mash the sweet potato. Let cool.

2) Mix the sweet potato with glutinous rice flour, coloring, water and knead until smooth. Divide the dough into 12 portions.

3) Flatten dough and place filling into the center. Gather edge to form a ball.


4) Grease the moulds with some cooking oil. Place dough on mould and lightly press into mould.


5) Remove dough from mould and place it on the banana leaf.


6) Place the Kueh in the steamer and steam for 15 mins over boiling water. And enjoy!
I hope everybody had a great weekend. Sometimes the little things in life really recharges the soul and make you feel like you have been re-born. Here is Ang Ku Kueh to celebrate the joyous moments in your life.

Tuesday, April 14, 2009

Napa Valley and Apple Pie


Last week I had the pleasure of travelling to Napa Valley. During the trip I visited a few wineries and selected three bottles of wine to bring home. I am definitely not a wine expert, but I do go with what I like. Being an Asian with a mutated form of alcohol dehydrogenase, I naturally like to pick wines lower in alcohol content (around 10% is ideal). I also have a sweet tooth.

The first winery I visited was V. Sattui. They are a small family-owned winery and make good quality wines. http://www.vsattui.com/. The Muscato, with it's fruity apricot and orange bloom bouquet, really appealed to me during the tasting. So did the Gammay Rouge (a Rose) with strawberry overtones. I also love the rich strawberry color....So... I bought two bottles of wine!


I also visited a bigger scale winery, Robert Mondavi. It was amazing to see rows and rows of uniformly lined up vines. I also gave a talk on wine making and chemistry there.

http://www.robertmondaviwinery.com/flash/index.cfm?month=4&day=14&year=1986&x=63&y=24

Here, I was given (very generous of the staff of Robert Mondavi, welcoming me as a speaker) a bottle of highly rated Cabernet Sauvignon 2004. I haven't tasted it yet, but I am sure it is as good as what the expert reviewers are saying online.

Anyways, when I got home, I found out later that Moscato goes really well with apple pie, so for dessert this weekend, this is what I made.


But, I didn't just want to make an apple pie. I wanted it to be extra special, so I cut it out using the apple cutter to create a beautiful pie crust with all cut outs. The beautiful part about making the crust this way is the overlapping of small pieces of dough creates a natrual vent for the steam to escape. There is no need to cut any slits to let the steam out, the pastry stays put beautifully . The result is a beautifully elegant pie that is both delicious and presentable. I share with you here my apple pie recipe:

Pastry
Making good pastry is really practice makes perfect. The ingredients are basic, and with a little bit of practice, anybody can make a flaky pie crust in no time. And no, you don't need a food processor! I made my pie crust using nothing but a pastry cutter and a fork. The result was a melt in your mouth, crumbly crust. It also helps to use the highest quality European butter. The butter works itself easier into the flour. I have written the recipe carefully so that you can have similar results at home. And, as always, I can't stress often enough, you have to use an oven thermometer.

2 1/2 cups all purpose flour
2 sticks (1 cup of unsalted butter, cold, cut it into 0.5 cm cubes)
1 teaspoon salt
1/4 cup ice water

1) Sift the flour 3 times. Raise the sifter as high as you can without making a mess. We are going to incorporate air into the flour.
2) Put the cutted butter into the flour. Using your hands, gently lift the flour from the bottom to the top so that the butter is superficially coated with flour.
3) Using a pastry cutter and working quickly, cut the butter into the flour until it reassembles bread crumbs. (Use an up and down motion, do not rock the cutter back and forth or the butter will press itself into a big lump and we want to try to avoid that).
4) Using your fingertips, pick up little pieces of the "crumbs" and rub for 2-3 seconds. Drop it and repeat. This step incorporates the fats into the flour to give it the melt in your mouth texture. Work quickly and efficiently!
5) Put 1 tablespoon of water at the time and use a fork to "rake" the water into the crumbs.
6) To test if enough water is added, take a little bit of the dough and press it together, if it holds, you have added enough water.
7) Divide dough in half. Put each half of the dough on a big piece of cling wrap and give it a few firm but gentle kneads. Wrap the dough in the cling wrap and refrigerate for 1 hour before rolling it out.

Filling
2 pounds assorted apples: I used Jonagold, Braeburn and Empires. Peeled, cored and cut into 1/4 inch thick slices
Juice of 1 lemon
1/3 cup sugar
3/4 teaspoon ground cinnamon
1/4 teaspoon freshly grated nutmeg
1/4 teaspoon salt
2 tablespoon unsalted butter

1) In a large bowl, toss everything together (except the butter) until the apples are evenly coated.

Assembly
1)Roll out the each half of the dough into a 12 inch disk
2)Fit the dough into a 9 inch glass pie plate and press the dough on the edge of the plate. Trim the excess overhanging dough.
3) Put in the apple pie filling by arranging the apples neating in a circle. Dot the filling with the 2 table spoon of butter.
4) Using the other half of the dough, cut out little apple shapes

The cutters are available here:http://biodiversityherbs.com/products/cookiecutters/assortedcookiecutters.html


5) Arrange all the little cut outs, overlaping each other slightly to form a top pie crust.
6) Give it a good egg wash. Freeze pie for 30 mins.
7) Preheat oven to 400 F. Bake until pie turns golden (about 20 mins) then lower the temperature to 350 F. Continue baking for 40-50 mins or until the filling has thicken and the juices are bubbling.


Hey, what am I waiting for?!


Let's pour the wine that I lugged back from Napa Valley!


Cut the pie up and eat it! Yummy!


I hope you are having a good week!

Sincerely,

Julie

Sunday, April 5, 2009

Walnut Chocolate Cookies


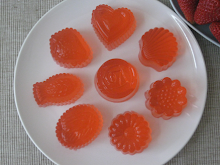
This is a beautiful cookie to serve for high tea when you invite your friends and family over to your home. Plated on a three tiered serving tray, the display is so elegant and looks like you have fussed over the cookie for a long time. When you take the time to put in a little extra effort for that extra touch, it makes the person visiting feel so special because you have taken the time to make something special for them.

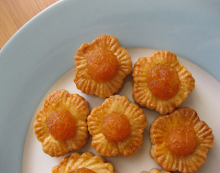
I share with you this beautiful and easy to make walnut cookie. The dough is a medium-density dough, but the texture is still crispy and will melt in your mouth. Because the dough is medium, it makes it much easier to mould.

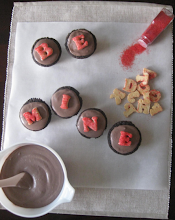
The flavor of this cookie is out of this world because of the perfect combination of ginger and cinnamon. The cookies are perfect to serve plain or sandwiched with a little chocolate butter. Making this yourself beats buying fancy cookies at Whole Foods or Famous Amos anyday. Also, shaping the dough and knocking it out makes a wonderful stress reliever. POW! A perfect release, a perfectly shaped cookie. It is surprisingly statisfying.


Walnut Cookies Recipe

Ingredients
(For the cookie)
2 1/2 cups all-purpose flour
1/2 teaspoon salt
1/2 teaspoon ground cinnamon
1/2 teaspoon ground ginger
6 ounces (1 1/2 sticks) unsalted butter, softened
1/2 cup granulated sugar
1/2 cup packed light-brown sugar
1 large egg yolk

Confectioners' sugar, for dusting moulds

Ingredients
(For the Chocolate-Walnut Filling-Optional for sandwiching)
3 ounces (6 tablespoons) unsalted butter, softened
1 cup confectioners' sugar
1 1/2 ounces (1/2 cup) walnuts, toasted and finely chopped
Pinch of salt
5 sounces semisweet chocolate, melted and slightly cooled


Directions for cookies:
1) Whisk flour, salt, cinnamon, ginger in a bowl.
2) Beat butter, cream cheese, and sugars with a mixer on medium speed until fluffy. (I use my handy Kitchenaid Stand Mixer. This takes about 2 mins).
3) Beat in egg yolk and then add flour mixture, beating just until combined.
4) Form dough into a 1-inch-thick disk, wrap in plastic and refrigerate at least for 1 hour or overnight.
5) Using a hand held sifter (use a small sifter if you have one), lightly dust the springerle cookie mould with icing sugar by tapping lightly. You have to ensure that the moulds are thinly and evenly dusted with sugar.
6) Press about 5 grams of dough into the mould with fingers, working from the center. Trim off overflowing dough and clean up the edges using a knife.
7) Give the mould a firm tap at a 45 degree angle (I tapped it on a cutting board because I have a wooden island countertop and did not want to ding it). The cookies will release easily.
8) Repeat the shaping with the rest of the dough, spacing the cookies 1 inch apart on a baking sheet lined with parchment paper.
9) Freeze the cookies for 1 hour before baking.
10) Preheat the oven to 325 degrees (Remember ALWAYS use an oven thermometer to get the temperature correct and best baking results).
11) Bake cookies until 25 to 30 mins and let cool on a wire rack*.
Directions for Chocolate Butter/Filling:
1) Cream butter with sugar on medium speed. I used a hand held mixer for this because it is a small quantity, I get better control of the texture.
2) Beat in walnuts and salt until combined. Beat in chocolate and use immediately.
*After the cookies has cooled, spread or pipe 1/2 teaspoon of chocolate walnut filling on the flat side of 1 cooke. Press the other flat side of another cookie onto filling to form a sandwich.

The moulds I used for the cookies are available here:
http://biodiversityherbs.com/products/cookiecutters/seashellmould.html

http://biodiversityherbs.com/products/cookiecutters/almondmould.html
I hope you will enjoy this recipe!
Sincerely,
Julie

Sunday, March 29, 2009

Biodiversity Baking's first photoshoot

We are updating Biodiversity Herbs and Baking Supplies's Website http://www.biodiversityherbs.com/ to give all of our customers a better shopping experience. We have teamed up with a talented Seattle photographer, Grace at I-Candi Studios http://www.candistudios.com/ for the photoshoot.

The new pictures are coming soon, and we can't wait to share them with you.

In the meantime, here is a sneak peak from the photoshoot from this past weekend.

Welcome! It is now 11:30 am on Saturday, and this is BioDiversity Herbs and Baking Supplies first product and food photoshoot! I am so excited.

Location: I-Candi Studios in Seattle, WA. What a hip and beautiful studio. I love it!

All of our products and the beautiful foods I made with them lined up on the counter, waiting for their turns to be photographed.

Hey, the photographer is at work. Let's take a look...

Our talented photographer, Grace, hard at work.

Photography 101- Lights! Then camera! It is really amazing how much your eyes compensate for what you see and what is actually there. The fundamental ingredient of good photography is good lighting. Grace uses a light meter to get the lighting just right.

Me, assisting the photographer and giving my two cents opinion on "artistic direction". I left most of that work to the photographer. She is the professional. I am the baker.

Sneaking a peak..... (To be revealed later this week, I love professional photography!)

And, that's a wrap! Biodiversity has officially completed our first product shoot. I have learned a lot from the experience and welcome you to enjoy them as well soon.

Sincerely,

Julie